The Employee New Request Screen is where employees can enter incoming requests into the system, from a phone call, email, or in person. This screen is divided into three main sections:
-
Customer Contact Information
-
Request Classification
-
Request Description
To view the New Request Screen, simply click on the New Request Command at the Request Log screen. The Request form will then appear (Figure 10).
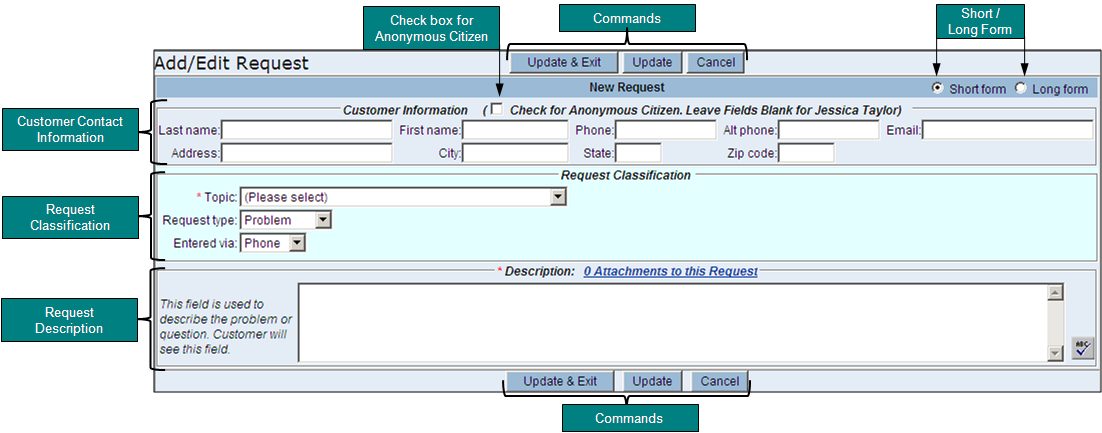
Figure 10 - Employee New Request Screen
The top part of the New Request screen is the customer contact information area (See Figure 11). Fill in as much information as the customer will provide. Some fields may be required such as the Last Name, or Phone Number depending on the topic selected in the Request Classification section. Required fields are indicated by a red asterisks. The system will prompt you with a message if you forget to fill out a required field on the form when you update the request.
If the citizen would like to follow-up on the request, certain fields are beneficial to record, (even if they are not required) such as the Phone number to call them back and their email address. The citizen Email is especially useful as the system provides several forms of communication with the citizen.
With a citizen email address, the system will:
-
Automatically send and email notification to the customer when the request is closed. The email notification contains a summary of the resolution and a satisfaction survey link for the citizen to report on the service.
-
Log all email communication between citizen and employee onto the Request Screen by using the
Collaboration Tools.
-
Provide the citizen with their account information, so they may sign-in online to submit and track the status of their own requests.
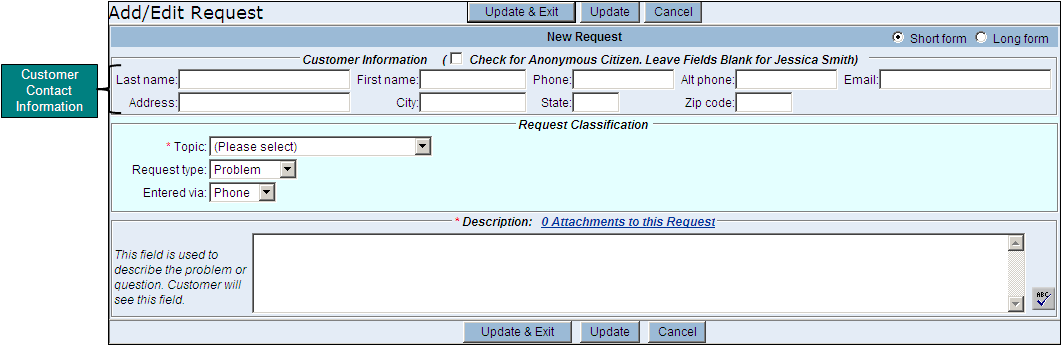
Figure 11 - Employee New Request Screen: Customer Contact Section
Anonymous Requests
Some topics will allow the citizen to submit an anonymous request if the contact fields are not required. To submit this section blank, you must check the box at the top labeled “Check for Anonymous Citizen.” (Figure 10). If you leave the Customer Contact Information blank without checking this box, the system will automatically fill in your own employee contact information and you are now the requestor.
Name Look-up List
Citizens will often have other requests in the system. If this is the case, a Name Look-up List will automatically appear on the screen once you type in their last name.
To use this feature:
Start typing the first few letters of their last name and press the TAB key or click on the next field on the screen. The system will automatically perform a search for names that begin with those letters. For example, if the citizen’s last name is “Jones”, type in the entire last name or just the letters “jon.” A pop-up window will appear with a list of possible citizens. Select the correct citizen’s first or last name and the information will be copied over to the request screen (Figure 12).
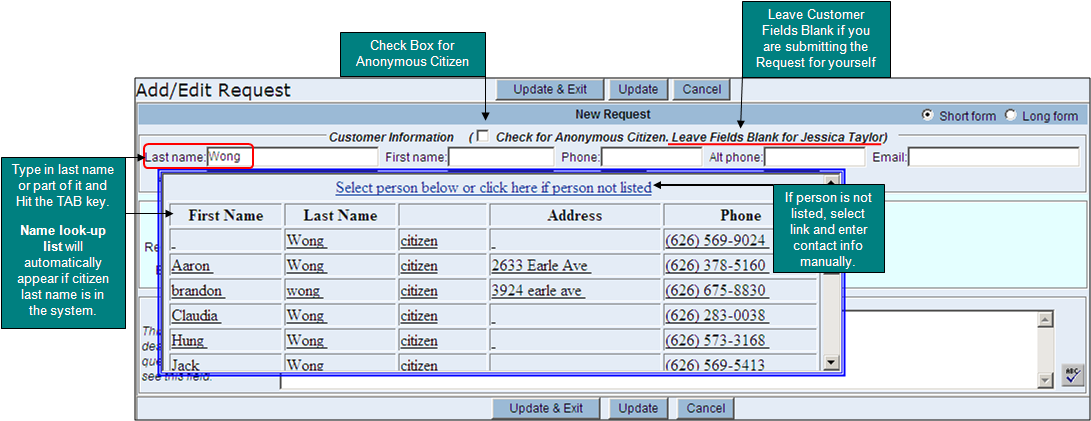
Figure 12 - Name Look-up List
Combining Accounts for same Citizen
It is important to use the Name Look-up list to keep requests for the same citizen on the same account. Choosing to ignore the Name Look-up list when the customer already has an account, will create two accounts and their new requests will not be linked to their previous requests. Exception: If the same email address matches their previous account, their requests will automatically link together.
Tracking Requests for a Customer
While you may use the Quick Find or Advanced Find search tools to find requests for a citizen, the New Request screen will also track the total number of requests for a citizen. If the citizen has more than one request filed, a link will appear next to their contact information (Figure 13).

Figure 13 - Tracking Requests for a Customer
Clicking on the request link for the customer, will display a dialog box (See Figure 14). You may click on the Request # to view the details of the request.
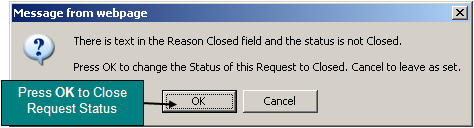
(*Note – You may only view the customer’s other requests if you have permissions to view them. Otherwise, the system will display the message “You do not have permissions to access the request”. The message will let you know the employee’s name that can access the request, so you may forward the caller to the appropriate employee. See Figure 15 to view the message. If you do have permissions to view the request, the system will take you to the request screen for that request).
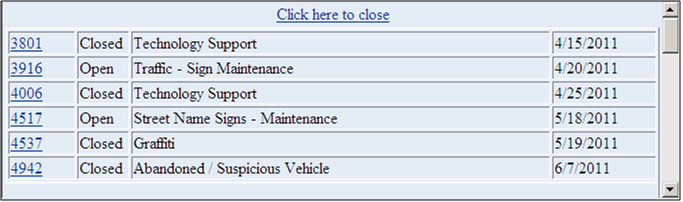
Figure 14 - List of Requests for Customer
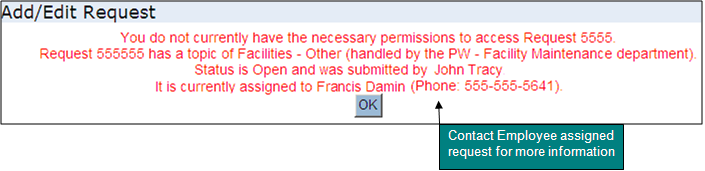
Figure 15 - Request Message: No Access
The Request Classification area is the section in the middle of the New Request Screen. It contains the details about the request, including the Topic name, Request Type, and how the request was entered. Depending on your agency’s preferences for specific topics, various fields will automatically appear for additional information. In Figure 16, the topic “Trash Cans or Containers” displays the “Problem Location” field. Other topics may display different fields to prompt the employee or citizen for the necessary information. These fields may include: License #, Park Name, Facility Name etc… (See Figure 16).
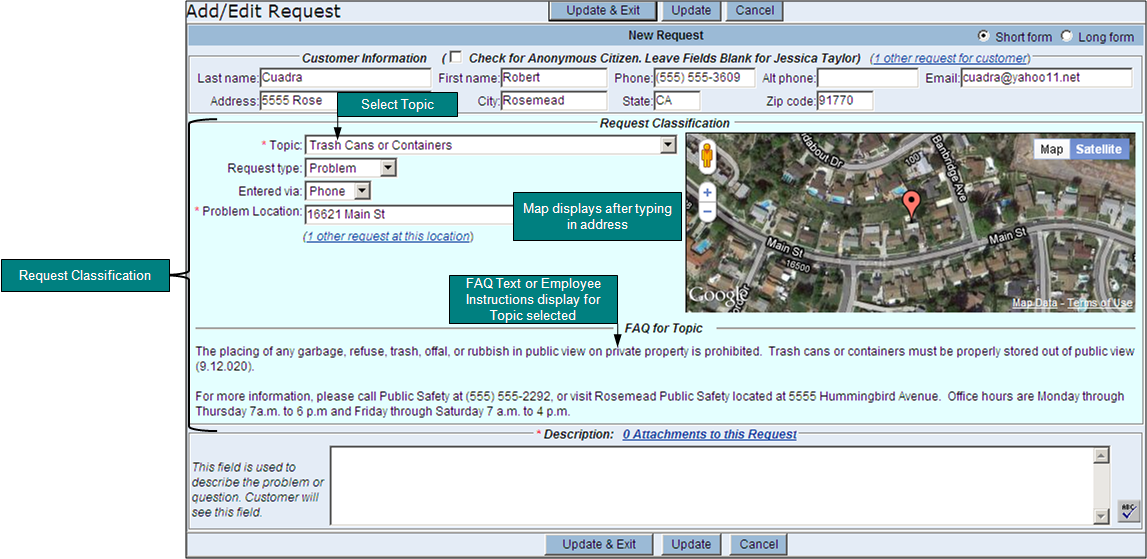
Figure 16 - New Request Screen: Request Classification
Each field is described below:
- Select a Topic – The Topic menu is categorized into several group headings, such as Animals, Streets & Sidewalks, and Parks & Recreation. Select the topic of the concern that best fits the citizen’s complaint or problem. Selecting the correct topic is important as it allows the request to be assigned to the correct employee (See Figure 17).
- Internal Requests: Requests that appear with a Green hightlight under the Topic Menu are Internal Requests. Internal Requests are topics relating to internal issues within your agency's offices. Most of these requests are help desk questions, or facility maintenance requests (i.e., Light fixtures, janitorial services, computer problems etc...). These requests will be directed to the appropriate employee for a response (See Figure 17).
- Request Type – Select problem, complaint, question or compliment to indicate the type of request.
- Entered Via – Select how this request was entered. The default is Phone. Additional choices are Web, Email, Android, or iPhone.
- Problem Location - Depending on your agency’s preferences for specific topics various fields will automatically appear for additional information. In this case, the Problem Location is a required field for the Animal Bites Topic. Other topics, may display a time-of-day field, or a License # field.
- Tracking Requests at a Location - The system will track all requests that have already been submitted at a Location. In Figure 16, a blue link below the Problem Location field appeared because there are other requests at this location. By clicking on this Link, a dialog box will display all the requests submitted at the location (See Figure 17). Clicking on one of the blue request numbers on the left will display the request screen for that topic. Note: You may not have permissions to view a request and the system will display a message in Red telling you the employee’s name who has access to it (See Figure 18). If you think you need access to a request that you do not have permissions to view, please contact your IT department or Government Outreach Support at Support@govoutreach.com.
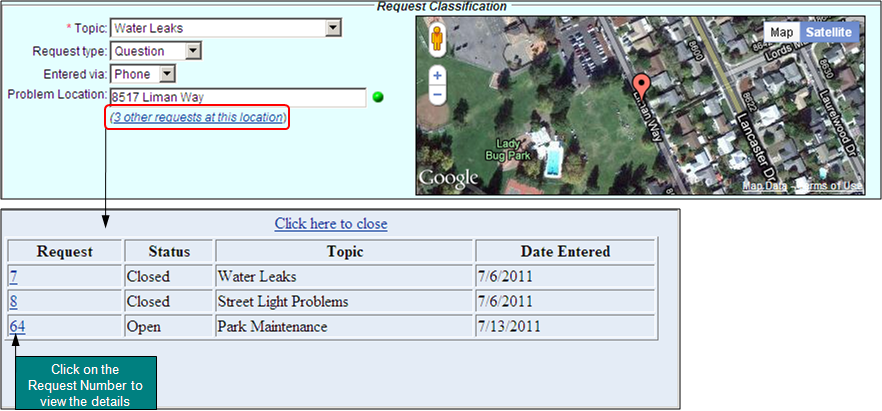
Figure 17 - Requests Listed at the Problem Location
Figure 18 - Display Message: No Request Access
The request Description is the last section of the New Request Screen. This field is used to describe the problem or question (See Figure 19). This is a required field before you Update & Exit the screen. If the citizen has provided an email address, the citizen can view what you write here when they log-in to their own account online or receive an email notification from the system.
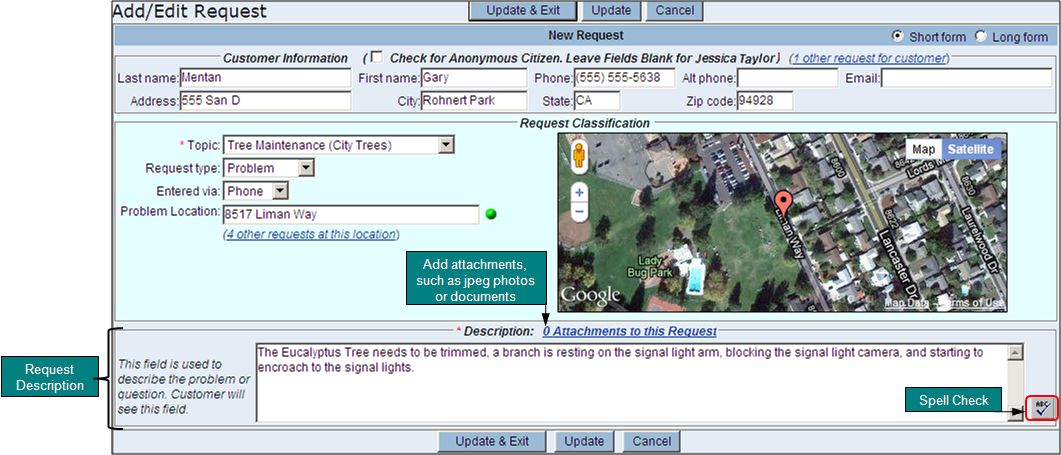
Figure 19 - New Request: Request Description
Fields to enter are:
- Description – Enter a detailed description for this request. This is a required field and the citizen will see what you write here if they provide an email address.
- Spell Check Button – The ABC button will check the spelling of any text in the Description field. It is important to use proper spelling in these fields as the citizen will see what you have typed if they sign-in to their own account online.
- Attachments to this Request – You may attach jpeg photos, Word documents, scanned letters, PDF files etc... to a request by clicking on the link at the top of Description Box. The citizen can view what is attached to a request if they have an online account unless the check box called "Hide from citizen?" is checked. Once the request is updated, the employee assigned this request will receive the attachments when they open the request.
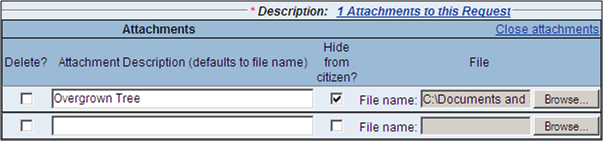
Figure 20 - Description Attachments
The command buttons at the top of the Request Screen include Update & Exit, Update, or Cancel. Both Update commands have different capabilities, but also function in the same 4 ways:
-
Saves all the information on the request to a database
-
Sends an email notification to the Employee assigned the request
-
Sends an email confirmation to the citizen (if citizen provided email address). If it is the Citizen’s first time submitting a request, the email will contain their account information to sign-in online.
-
The cancel button will exit the screen and not save the request.
Update & Exit Command Description
The Update & Exit command differs from the Update command because it will save the request and return to the Request Log screen. If the request description was entered for the first time, a dialog box will display the request number and the number of days to resolve the request (See Figure 20). If you give the request number and resolution date to the customer, the citizen can easily call back to check on the status of the request.
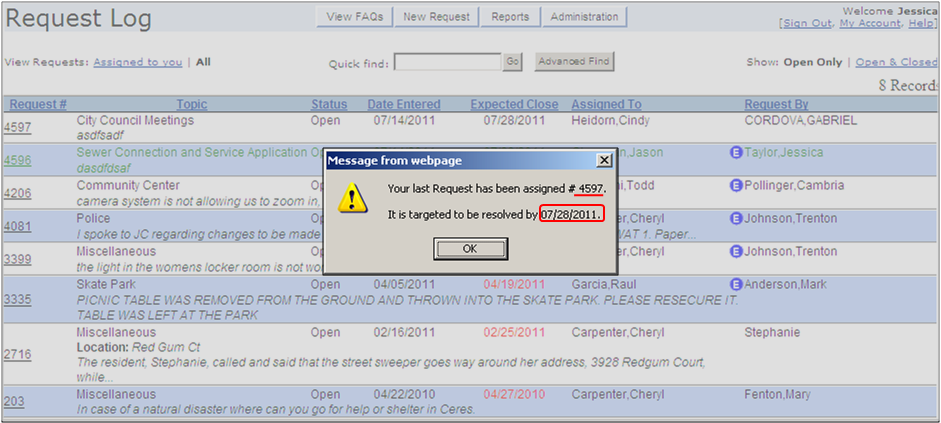
Figure 21 - Submitted Request Confirmation
Update Command Description
The Update button will save the request and keep you on the same request screen. The request screen will change slightly, after Updating by displaying extra fields and buttons (See Figure 22). Notice the request number and the expected close date are now displayed on this page. This information can be given to the customer, so they may follow-up on their request.
The other fields displayed include the employee’s name assigned the request, and a gray button called “Create another Request for Customer.” Selecting the “Create another Request for Customer” this will open a new request screen for the same customer. The customer contact info will be copied from the existing request to the new request for your convenience. Simply select a new topic and fill out the description of the issue. This is useful when a citizen calls in for two or three different problems at once. Each request must be submitted under a separate topic, so the correct issue is routed to the correct employee.
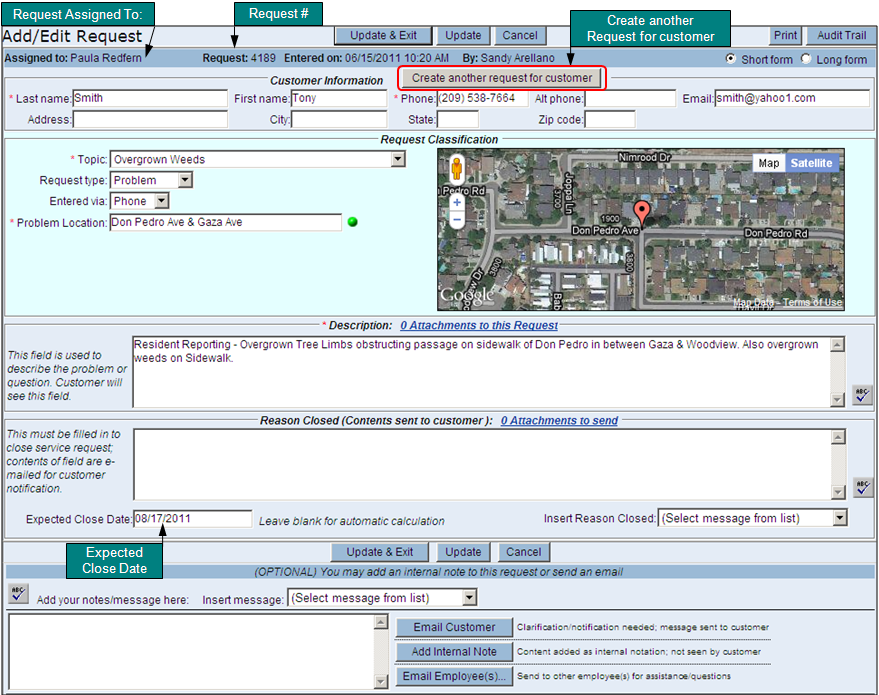
Figure 22 - Request Screen after Updating Request
At the top right corner of the New Request Screen, the request may be viewed as a Short or Long Form. The Long form will display 3 additional fields within the Request Classification section: Assigned to, Status, and Priority (Figure 23). In most cases, leaving the form default to Short form is sufficient.
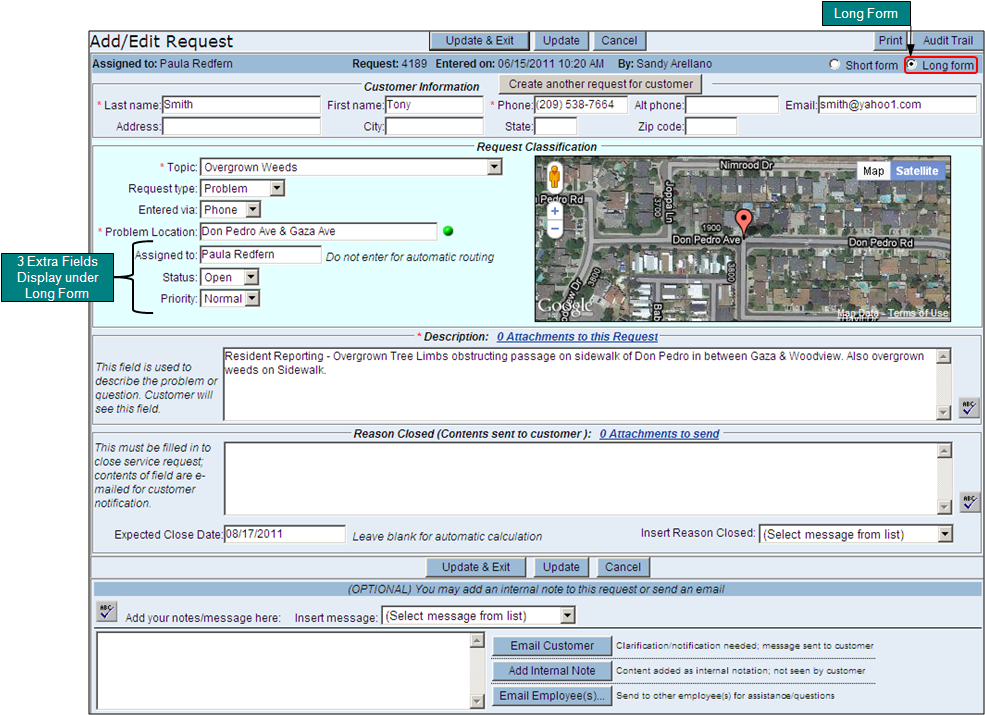
Figure 23 - New Request Screen: Long Form Display
Long Form Additional Fields:
- Assigned to – The topic selected will automatically assign the request to an employee after the request is updated. However, typing in part-of or the entire employee’s name and TABing out of the field will override the automatic routing. If there are multiple matches for the name, the system will display all posiblities. For example, if the employee’s name is Jennifer Canter, typing in “c-a-n” will find all employee names in the system containing these three letters such as Canfield, Duncan or Canter.